Download our aestheticPhoto + Video app
Cart
Congratulations! Your order qualifies for free shipping Spend $100 more for free shipping
Your cart is empty.
Continue browsing
Shipping & taxes calculated at checkout
Results for diy-no-carve-pumpkin-decorating/
Filter
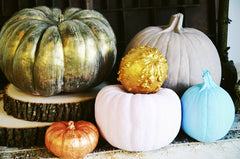
DIY no carve Fall/Thanksgiving pumpkin decorating
DIY Color Palette Pumpkins
Are Cookies OK?
We use cookies to improve your browsing experience